
RAM - 256MB Minimum. 512 MB Recommended
Virtual Memory - 512 MB to 1 GB
Disk Space - 2.5 GB Minimum
Software Requirements
System Architecture - Processor: Intel X86, AMD 64 and Intel EM64T
Operating System - Windows XP Professional, Windows 2000
Install Loopback Adapter
If you are installing Oracle Database on a DHCP computer or on a Non-Networked Computer, then you may want to install Loopback Adapter. The Loopback adapter and the local IP address simulate a networked computer. If the Computer is connected to a network then this step may be ignored.
Click Here for the steps to install loopback adapter.
Preparing Diskgroups for Automatic Storage Management
Step 1: Create Disk Partitions
For this sample installation I use only one Disk and create logical partitions on it. For production implementation create a primary partition on each disk.
To create partitions,
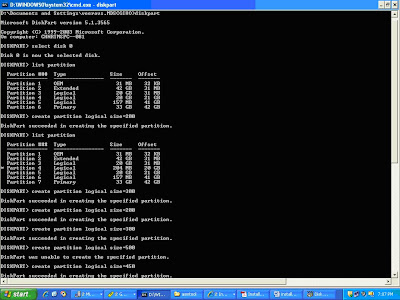
C:\> Diskpart
DISKPART> list disk
DISKPART> Select disk 0
To create a logical partition, the size is in MB.
DISKPART> Create partition logical size=1024
To create a primary partition , the size is in MB
DISKPART> Create partition primary size=1024
To view the partitions created
DISKPART> List partition
Repeat for other disks
The created volumes must be unformatted, that is, the Fs column must be blank in the following command. In the following output NTFS indicates NT File system and hence cannot be used as ASM disk.

Stamp ASM Disks
To use ASM, the disks must be stamped with a header. Use ASMTOOL to stamp each partition with an ASM label so that oracle can recognize these partitions as candidate disk. Navigate the oracle media to find the asmtool folder. Click the asmtoolg.exe.

Select the Add or change label dialog and press Next button.

Select the Candidate Disk and assign a asmdisk group name. Click Next.

Click Next.

Click Finish.
Repeat the process for each disk group.
Thanks


4 comments:
hi bro thanks for the post
i get an error while creating a logical partition while issuing the command
create partition logical size=1024
the error is
"was unable to create the specified partition"
i would really appreciate if you could help me out with this thanks in advance
In Windows a Logical Partition must go 'inside' an Extended Partition, so:
diskpart>create partition extended
(size= is optional)
THEN:
diskpart>create partition logical
Or try from the DISKMGMT.MSC GUI first to get comfortable.
Thanks, your post was very useful
It is wonderful vinod, this kind of notes (with image illustrations) are very helpful to me like new to Oracle DBA
Post a Comment