
Note: Adding new disks to diskgroup invokes implicit rebalancing of all the disks within the diskgroup.
Instance: ASM Instance
Privilege: Sysdba
Syntax
ALTER DISKGROUP diskgroup_name ADD [FAILGROUP failgroup_name] DISK add_disk_clause rebalance_diskgroup_clause
Where
Add_disk_clause = search_string [NAME disk_name] [SIZE size_clause] [FORCE/NOFORCE]
Force – Add disk to the diskgroup even if the disk is part of some other diskgroup.
NoForce – ASM returns error if the disk is part of some other diskgroup.
Rebalance_diskgroup_clause = REBALANCE POWER integer WAIT/NOWAIT
Integer – 0 to 11. If you omit ASM takes the value from ASM_POWER_LIMIT init parameter.
WAIT – The control is not returned to the user until the rebalance operation completes.
NOWAIT – The control immediately returns to the user and the rebalance operation takes place at the background and user can continue to do other operation.
Example 1
SQL> Alter Diskgroup ASMDATA ADD
FAILGROUP ctrl_1
DISK
'/u01/asmdisks/disk1' NAME data_05 NOFORCE,
'/u01/asmdisks/disk2' NAME data_06 NOFORCE;
Example 2
SQL> Alter Diskgroup ASMIND ADD
DISK '/dev/rhdisk33'
REBALANCE POWER 5 ;
Thanks
Saturday, December 19, 2009
Dropping a Diskgroup in ASM
Instance: ASM Instance
Privilege: Sysdba
Syntax:
DROP DISKGROUP diskgroup_name INCLUDING/EXCLUDING CONTENTS;
Including Contents – Drops all the files associated with the disk group.
Excluding Contents – Drops the disk group only when it is empty. Default.
Example 1
SQL> Drop Diskgroup ASMDATA including contents;
Example 2
SQL> Drop Diskgroup ASMIND;
Thanks
Create a new Diskgroup in ASM
Instance: ASM Instance.
Privilege: Sysdba
Pre-requisite: Disks must be formatted. The path of the disk must be in the ASM_DISKSTRING. Oracle DB user must have read/write permission on the disk.
Syntax:
CREATE DISKGROUP diskgroup_name redundancy_level REDUNDANCY [FAILGROUP failgroup_name]DISK disk_clause
Where,
redundancy_level = HIGH or NORMAL or EXTERNAL
disk_clause = search_string [NAME disk_name] [SIZE size_clause] [FORCE/NOFORCE]
Force – Add disk to the diskgroup even if the disk is part of some other diskgroup.
NoForce – ASM returns error if the disk is part of some other diskgroup.
Example 1
CREATE DISKGROUP asm_data
NORMAL REDUNDANCY
FAILGROUP ctrl_1
DISK
'/u01/asmdisks/disk1' NAME data_01 NOFORCE
,'/u01/asmdisks/disk2' NAME data_02 NOFORCE
FAILGROUP ctrl_2
DISK
'/u03/asmdisks/disk3' NAME data_3 NOFORCE
,'/u03/asmdisks/disk4' NAME data_4 NOFORCE;
If the size clause is omitted the full disk is assigned.
Example 2
SQL> CREATE DISKGROUP ASMIND External REDUNDANCY DISK
'/dev/rhdisk6' SIZE 51200M ,
'/dev/rhdisk7' SIZE 51200M ,
'/dev/rhdisk8' SIZE 51200M ;
If the name clause is omitted the disks are given a system generated name.
Thanks
Thursday, December 10, 2009
Install Oracle 10g on Windows XP - Part 3
In the last part2 we discussed ASM installation. In this part we will see the RDBMS installation.
Step 1: Invoke the OUI. Select the Advanced installation option and then click Next.
Step 2: Select the installation type for eg., Enterprise
Step 3: Specify the Oracle Home details. Choose a different path from ASM home.


Step 4: In the next page select the option to create the database.


Step 5: Specify a Database Name. Choose the character set.

Step 6: Select Database control for Database Management.

Step 7: In the select database storage option page, select ASM.

Step 8: In the next page click the option that best matches your requirement.

Step 9: Select the ASM Disk Group.


Click Exit.
The oracle RDBMS is installed.
Thanks
Install Oracle 10g on Windows XP - Part 2
In this part we will see the ASM installation and ASM instance Creation.
Step 1: Invoke the Oracle Universal Installer. In the Welcome Screen select Advanced Installation and click Next button.

Step 2: In the Select Installation Type, select the appropriate choice. In our case we select Standard Edition.

Step 3: Specify the ASM Home details.

Click Next.

Step 4: Check for any errors and correct it if any. Click Next.

Step 5: Choose the Configure Automatic Storage Management option and specify the SYS password. Click Next.

Step 6: In the next screen do the following,
- Specify the Disk Group name.
- Choose the redundancy type.
- Select the candidate disks you want to assign for this disk group.

Click Next

Step 7: Click Install.


Click the Exit button. The ASM installation is completed.
Note: You can use the DBCA to create addition disk groups.
Thanks
Wednesday, December 9, 2009
Install Oracle 10g on Windows XP using ASM - Part 1
Hardware Requirements
RAM - 256MB Minimum. 512 MB Recommended
Virtual Memory - 512 MB to 1 GB
Disk Space - 2.5 GB Minimum
Software Requirements
System Architecture - Processor: Intel X86, AMD 64 and Intel EM64T
Operating System - Windows XP Professional, Windows 2000
Install Loopback Adapter
If you are installing Oracle Database on a DHCP computer or on a Non-Networked Computer, then you may want to install Loopback Adapter. The Loopback adapter and the local IP address simulate a networked computer. If the Computer is connected to a network then this step may be ignored.
Click Here for the steps to install loopback adapter.
Preparing Diskgroups for Automatic Storage Management
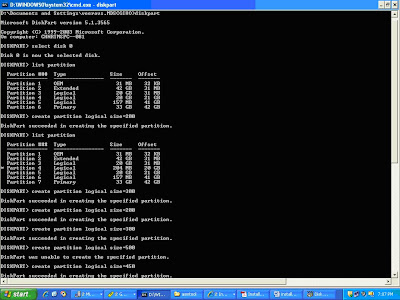
Step 1: Create Disk Partitions
For this sample installation I use only one Disk and create logical partitions on it. For production implementation create a primary partition on each disk.
To create partitions,
C:\> Diskpart
DISKPART> list disk
DISKPART> Select disk 0
To create a logical partition, the size is in MB.
DISKPART> Create partition logical size=1024
To create a primary partition , the size is in MB
DISKPART> Create partition primary size=1024
To view the partitions created
DISKPART> List partition
Repeat for other disks
The created volumes must be unformatted, that is, the Fs column must be blank in the following command. In the following output NTFS indicates NT File system and hence cannot be used as ASM disk.

Stamp ASM Disks
To use ASM, the disks must be stamped with a header. Use ASMTOOL to stamp each partition with an ASM label so that oracle can recognize these partitions as candidate disk. Navigate the oracle media to find the asmtool folder. Click the asmtoolg.exe.

Select the Add or change label dialog and press Next button.

Select the Candidate Disk and assign a asmdisk group name. Click Next.

Click Next.

Click Finish.
Repeat the process for each disk group.
Thanks
Subscribe to:
Posts (Atom)


